 I import the sketch file to the illustrator. Then, I resize it to the same size as the A3 by clicking the Free Transform Tool and by holding down the shift key and pulling the corner anchor point to enlarge it accordingly without the change of shape.I set the sketch into a template file and set the layer name into sketch by double click the layer file.
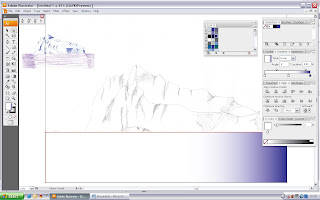
Then, I create a new layer with the replacement name to Sea with the same way by double click the layer file. Since the sea level is like border line between the iceberg and the sea. So, I will start off with illustrating the sea first but before I do so, I import the sketch with colour apply on it to used it as reference. Now to illustrate the sea, I draw a straight line with the pen tool and intersect around the below border. Then, I apply the gradient to it. In order to apply the gradient correctly white in between the blue. I click on the gradient panel and move the white pointer to the middle. After that, I add on another pointer to it. To apply colour, I go to the swatches panel and browse the swatches library and choose the colour properties that lead to the cool. From there I choose my colour for the sea and apply the change of name to it as sea.

With chosen colour swatches, I move it to the left white pointer. End up, white colour in between the blue. As the gradient colour is not correctly place between the iceberg and the sea, I drag the gradient slider to the point that suit my illustrator.
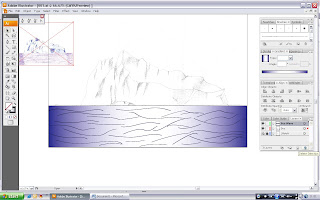
What made a sea without wave? So, I create a new layer with the name of sea wave. Then, I used the pen tool to draw line on the sea and exchange the stroke colour to deep colour blue. With the repeat procedures. I manage to create a sea wave.
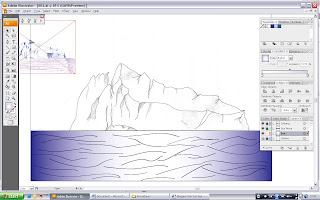
The sea have been done and it time to move on to the iceberg. I start off by create a new layer for the iceberg and draw the outline by the aid of the pen tool. I specially draw another straight line bellow the iceberg. This will ease me when I want to paint the iceberg white in the later procedure.
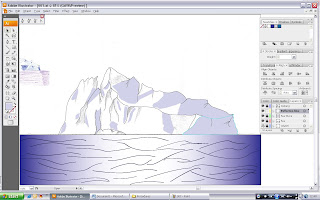 As the ice berg is being shine by the sun and sea just bellow the iceberg, there will be reflection of white, blue and even deeper blue. So, I create a new layer that is specially for illustrating the reflection of blue. I draw the reflection with the pen tool and with the setting of the stroke is set to none that will not show any outline. I also choose a new swatches colour that I set the name to reflection blue as the fill colour. Then, I illustrate according to my reference sketch.
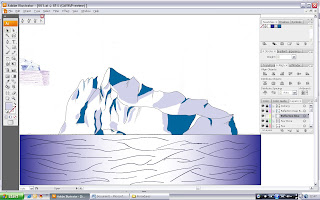
With the same procedures of the no. 6, I illustrate the deep blue reflection of sea with reference of the sketch.
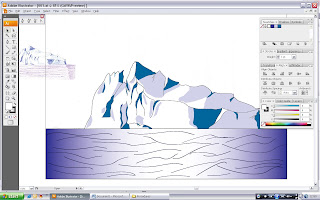 After that, I lock every layer except the iceberg layer. Then, I create a new layer on top of the sea wave layer and name it Iceberg (White) which it is to fill in the white colour that as the main colour of it. I select the iceberg layer and drag the selection tool around the iceberg and copy it. After it is copy, I select the iceberg (White) layer and paste it. The copy of the iceberg outline sure will be out from the main. I slowly drag it to match it to the original outline. With the outline match, I group it and paint it with live paint tool. I select the swatches that I rename it iceberg.
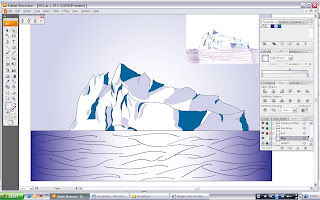
After that, I lock every layer except the iceberg layer. Then, I create a new layer on top of the sea wave layer and name it Iceberg (White) which it is to fill in the white colour that as the main colour of it. I select the iceberg layer and drag the selection tool around the iceberg and copy it. After it is copy, I select the iceberg (White) layer and paste it. The copy of the iceberg outline sure will be out from the main. I slowly drag it to match it to the original outline. With the outline match, I group it and paint it with live paint tool. I select the swatches that I rename it iceberg.After everything is done, I feel that the sky is kinda boring as it is white only. So, I create a new layer on top of sketch layer and name it Sky. I click the pen tool and draw around the border of the whole A3 size and select the stroke to none while the fill with gradient. As the blue is part of the reflection, I used it as the sky colour which suit the whole illustration. I chose the type gradient from linear to radial as to represent the sun behind the iceberg and drag the swatches colour of reflection blue to the gradient.

No comments:
Post a Comment