Habitats/BehavioursAn Arctic iceberg breaks off from a
glacier and can be found floating in the water or aground. Icebergs themselves don't exist for many years, but the glaciers that calve them are thousands of years old.
Iceberg timeline:
1,000 B.C.: Snow falls on arctic ice caps and, during the next several months, turns into firn – a granular form of snow.
950 B.C.: The firn is compressed into dense ice because of the added firn and snow that have accumulated on top of what fell 50 years earlier.
Between 950 B.C. and 2002 A.D.: The weight of the ice cap forces the ice to slowly flow seaward.
1993 A.D.: Icebergs are calved – break off of the glacier – because they are weakened by the rising and falling tides on the coast.
1996 A.D.: The icebergs calved three years previous melt. An estimated one percent of icebergs make it as far as the Atlantic Ocean. If an iceberg travels that far, it will melt within months from the warm waters. If an iceberg stops drifting in Baffin Bay, however, it can take more than four years for the iceberg to melt.
RangeWestern Greenland's glaciers calve 90 percent of all icebergs found in Newfoundland's waters. This means that between 30,000 and 40,000 icebergs are calved annually.
After calving usually on the west coast of Greenland, icebergs drift to the coast of Newfoundland, which is about
1,800 nautical miles. The average iceberg drift speed is about 0.7 kilometres per hour, but this is influenced by factors including iceberg size, shape, currents, waves and wind. They travel in the Baffin Current, then the Labrador Current and finally reach the Grand Banks of Newfoundland. Once they reach the Grand Banks, icebergs drift either eastward – north of the Flemish Cap – or southward between the Flemish Cap and the Grand Banks – also known as
Iceberg Alley.
Link:
http://www.canadiangeographic.ca/magazine/ma06/indepth/nathistory.aspIcebergsIcebergs are pieces of floating ice that calve (break off) from ice shelves and glaciers. They can be of any size and are very common in the Southern Ocean. Believe it or not, scientists call small icebergs growlers (these are about the size of a small car) while the next biggest size of iceberg are called bergy bits (these are about the size of a house and no, we aren't making the name up!).
Icebergs that calve from ice shelves are tabular (flat topped) but icebergs may also be described as dome-shaped, sloping, pinnacled, weathered or glacier bergs.
The rule that 90% of an iceberg lie underwater is true and this is one of the reasons why they are so dangerous to Ships, as you can't see their shape under water. Another dangerous thing about icebergs is that because they move with the ocean currents, they cannot be marked on navigation charts.
When HMS Endurance is in Antarctica, the Ship's Meteorologists use radar and satellites to help them locate the position of drifting icebergs and this information is also passed on to all the ships in the area. Although HMS Endurance is of a special design so that it can withstand the shocks of constantly breaking through ice, every possible measure is taken to avoid a collision with an iceberg. The most famous Ship to hit an iceberg was the Titanic in 1912.
Scientists use a particular coding system for naming icebergs. When an iceberg is first sighted, it is given a letter of the alphabet (A,B,C or D) and a sequential number.
Satellite pic by NASA of icebergs

The letter of the alphabet relates to the particular sector of Antarctica in which the iceberg was first sighted:
A = Bellinshausen/Weddell Sea
B = Amundsen/Eastern Ross Sea
C = Western Ross Sea/ Wilkesland
D = Amery/ Eastern Weddell Sea
Eventually, storms, waves and warmer surface water all help to melt drifting icebergs, but they have been known to last over 6 years.
Link:
http://www.visitandlearn.co.uk/factfiles06/ice6.aspMelting Ice and Sea LevelsEach year about 8 mm (0.3 inch) of water from the entire surface of the oceans goes into the
Antarctica and
Greenland ice sheets as snowfall. If no ice returned to the oceans, sea level would drop 8 mm every year as much of the deposited snow is water originally from the ocean. Although approximately the same amount of water returns to the ocean in icebergs and from ice melting at the edges, scientists do not know which is greater, the ice going in or the ice coming out. The difference between the ice input and output is called the mass balance and is important because it causes changes in global sea level.
The Archimedes' Principle helps us understand why and how sea levels rise:
Archimedes' Principle - When an object is completely or partially immersed in a fluid, the fluid exerts an upward force on the object equal to the weight of the fluid displaced by the object.
Firstly, when considering melting ice and sea levels, we need to appreciate that ice is either already floating in the ocean or it is grounded on a landmass.
Because of Archimedes' Principle, if the ice is already floating in the ocean, the total mass of the ocean and ice remains unchanged even when the ice melts. Dr. Peter Noerdlinger, a professor at St. Mary’s University in Nova Scotia, Canada, has recently demonstrated that the difference in density between the fresh water ice and salt water of the oceans will add a small amount to sea levels when this ice melts.
However, the real rise in sea levels comes from ice that is grounded on a landmass. As the melted ice flows as water, or falls as ice chunks into the ocean it increases the total volume of the ocean. That is, ice discharged from a grounded ice sheet directly into the ocean has an immediate impact on sea level. Because the Greenland and Antarctic ice sheets are sitting on land and not floating, they have the potential to raise sea levels significantly.
Ice Sheets, Ice Shelves, Icebergs and Sea IceTo understand the connection between melting ice and sea levels, we also need to appreciate the difference between Ice Sheets, Ice Shelves, Icebergs and Sea Ice.
The Antarctic ice sheet is the largest single mass of ice on Earth. It covers an area of almost 14 million km² and contains 30 million km³ of ice. Around 90% of the fresh water on the Earth's surface is held in the ice sheet, and, according to Richard S. Williams, Jr., United States Geological Survey geologist, if melted, could cause sea levels to rise by 65 meters (213 feet, although the 4th IPCC report suggests a rise of 57 metres or 187 feet). The Greenland ice sheet occupies about 82% of the surface of Greenland, and if melted would cause sea levels to rise by 7 metres (23 feet).
An
ice shelf is a thick, floating platform of ice that forms where a glacier or ice sheet flows down to a coastline and onto the ocean surface. Ice shelves are found in Antarctica, Greenland and Canada only. Ice shelves can actually float up and down with the tides, grating against the rocks and eventually breaking apart. Because they are already floating on the water, ice shelves do not raise sea level when they melt (except by a small amount due to the salt-freshwater differential as noted by Noerdlinger).
Ice shelves flow by gravity-driven horizontal spreading on the ocean surface. That flow continually moves ice from the grounding line to the seaward front of the shelf. The primary mechanism of mass loss from ice shelves is
iceberg calving. With regards to melting ice and sea levels, and because icebergs are already floating they have little impact on sea levels.
In contrast to the above,
sea ice or pack ice is formed on water, is much thinner, and forms throughout the Arctic Ocean and Southern Ocean around the continent of Antarctica. Again, and in terms of melting ice and sea levels, sea ice has little impact on overall sea level rise.
Link:
http://www.global-greenhouse-warming.com/melting-ice-and-sea-levels.html
 Hear I will make some description toward my illustration. This illusration is create based on the slogan of DETRUCT OR PROTECT which I used to make the society aware the important of
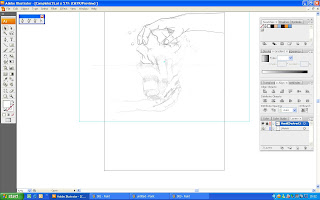 Next, I create a new layer with the name of hand(Destruct). I draw the outline with the pen tool(With fill set to none) according to the sketch that I import to the Illustrator.
 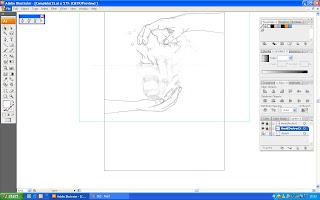 I repeat the previous procedures but with the new layer name set to hand(protect).
 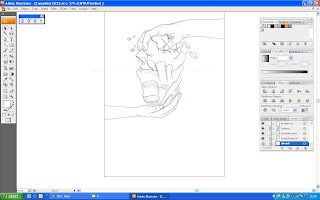 On the next list, is to draw the outline of the iceberg with the previous method on the new layer of "iceberg" as the layer name.
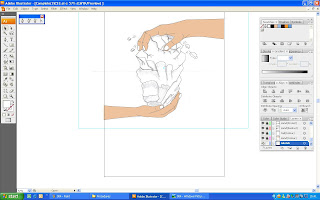 As all the outline of my sketch is make into illustration, I proceed into painting my illustration. I create a new layer with the name of Colour (Hand) to put colour to the two hand. I browse throught the swatch and find a colour that identitical to human skin colour and rename it as Skin Colour in swatches. Then I used the pen tool to draw according to the outline of the hand with the stroke set to none and fill to none for it ease to draw as the outline. After it is done, I change the fill to the swatches that I selected previously to paint it in colour. I paint the nail too as the same method with the white swatch that I selected and rename it as nail & iceberg(For the following procedures). With the both hand illustrated, I sent the layer to the back of the both hand to show the out line of previous I drawn for the hands.
 With both hands done, I continue to paint the iceberg, I create new layer with the name of Iceberg(White) becasue I need to paint it white as the base colour of the iceberg. With the same method before, I used the pen tool and set the fill and stroke to none. After all the outline nicely drawn, I change the fill of the pen tool to the swatches of Nail & Iceberg and sent the layer to the back of the iceberg.
 Next, I create a new layer again with the name of Iceberg(Blue) which I used this layer to paint the reflection of the ice. To ease the painting, I hide the layer of Iceberg(White) as it cover the sketch that I draw the shadow as the refelction. I used pen tool with the fill set to the swatches that I selected and rename it as iceberg(Blue) and stroke set to none and draw the outline accordingly. Then, I sent the layer back but in front of the layer of iceberg(White).
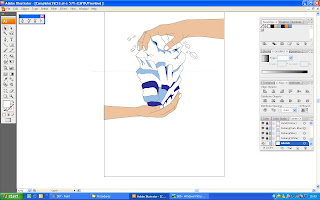 The method for the next procedures are as same as the previous one but this time, I also hide the layor of Iceberg(Blue) which also cover the sketches layer. With the layer hide, I repeat the procedure with fill change to another swatches which I selected form the swatches library and name it iceberg(Dark Blue). This layer is sent to the back but in front of layer of Iceberg(Blue).
  For the final painting on the icberg, will be the crack and shadow part of the iceberg, I create a new layer with the name of Crack and Shadow andI hide the layer of the iceberg(Dark Blue) to see enable me to see the sketch of crack easily and draw easily. I also repeat the previous procedures but this time, I only used sketch as reference but it is draw somehow larger than the original to show the crack more and the fill of black's swatches that I name it crack and shadow. This layer is sent to the back but in fornt of the layer of Iceberg(Dark Blue)
 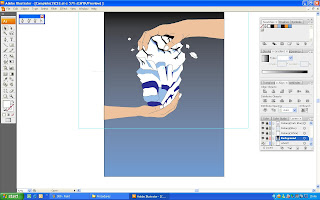 As all the illustartion are done, I move on to the background illustration. I create a new layer first with the name of background. After that I search through the swatch library and find one blue and black swatches to be use as the background colour and name both of it to background 1 and background 2. On the backgound's layer, I draw a rectangle around the whole A3 size of my illustration and select the gradient colour to fill in and also the stroke change to none. At the gradient's window, I drag the swatches of backgound1 and 2 to each arrow of the gradient. Then, I rotate the gradient at the gradient's window to 90 degree. I sent the background layer to the back but before the sketch's layer.
 I proceed to the statement procedures, I create a new layer with the name of wording. I start with the main statement of destruct. I select the Type tool and click onto the illustration and type the word of DESTRUCT and change the font size to 72. The fill colour is change to the orange colour of swatch that I selected and rename it to wording. I repeat the procedures for the wording of PROTECT too. I arrange both with the aid of selection tool to the location that I wanted. I also made another two small statement to give a small idea to my audience. The same procedure but font size set to 36 and fill to white swatch which I selected and name it wording(White). Since, there are two small statement, it will be one type "IS A MATTER OF CHOICE" and another "CHOOSE WISELY". So, both could be change to it location with selection tool to it rightful position in the poster.
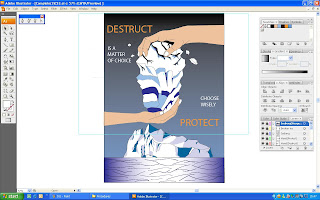 Following the next step will be creating a new layer with the name of Iceberg(Assgn 2) which I will import the whole Iceberg that I illustrate for the assignment 2 to this layer. I open the file of the assignment 2 and with select tool I drag the whole Iceberg and pull it into the assignment 3 and resize it with the help of free transform tool and locate it to the bottom of the poster.
 Lastly, with the previous same method I import the symbol from assignment 1 to the poster on the new layer that I rename it symbol. I resize it with the help of Free Transform tool and place it bottom right corner.


