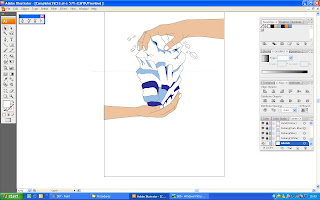
 Firstly, I import the sketch file to the illustrator. Then, with the aid of free transform tool, I resize it according by holding the Shift button to the size of A3. I set the sketch into a template file and set the layer name into sketch by double click the layer file.
 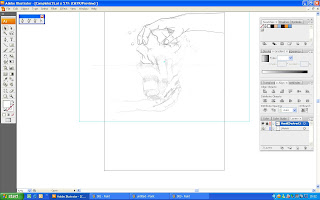 Next, I create a new layer with the name of hand(Destruct). I draw the outline with the pen tool(With fill set to none) according to the sketch that I import to the Illustrator.
 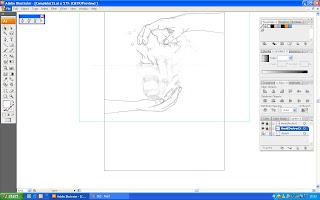 I repeat the previous procedures but with the new layer name set to hand(protect).
 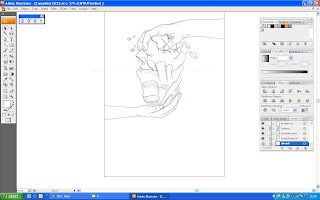 On the next list, is to draw the outline of the iceberg with the previous method on the new layer of "iceberg" as the layer name.
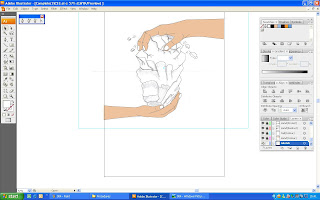 As all the outline of my sketch is make into illustration, I proceed into painting my illustration. I create a new layer with the name of Colour (Hand) to put colour to the two hand. I browse throught the swatch and find a colour that identitical to human skin colour and rename it as Skin Colour in swatches. Then I used the pen tool to draw according to the outline of the hand with the stroke set to none and fill to none for it ease to draw as the outline. After it is done, I change the fill to the swatches that I selected previously to paint it in colour. I paint the nail too as the same method with the white swatch that I selected and rename it as nail & iceberg(For the following procedures). With the both hand illustrated, I sent the layer to the back of the both hand to show the out line of previous I drawn for the hands.
 With both hands done, I continue to paint the iceberg, I create new layer with the name of Iceberg(White) becasue I need to paint it white as the base colour of the iceberg. With the same method before, I used the pen tool and set the fill and stroke to none. After all the outline nicely drawn, I change the fill of the pen tool to the swatches of Nail & Iceberg and sent the layer to the back of the iceberg.
 Next, I create a new layer again with the name of Iceberg(Blue) which I used this layer to paint the reflection of the ice. To ease the painting, I hide the layer of Iceberg(White) as it cover the sketch that I draw the shadow as the refelction. I used pen tool with the fill set to the swatches that I selected and rename it as iceberg(Blue) and stroke set to none and draw the outline accordingly. Then, I sent the layer back but in front of the layer of iceberg(White).
 The method for the next procedures are as same as the previous one but this time, I also hide the layor of Iceberg(Blue) which also cover the sketches layer. With the layer hide, I repeat the procedure with fill change to another swatches which I selected form the swatches library and name it iceberg(Dark Blue). This layer is sent to the back but in front of layer of Iceberg(Blue).
 For the final painting on the icberg, will be the crack and shadow part of the iceberg, I create a new layer with the name of Crack and Shadow andI hide the layer of the iceberg(Dark Blue) to see enable me to see the sketch of crack easily and draw easily. I also repeat the previous procedures but this time, I only used sketch as reference but it is draw somehow larger than the original to show the crack more and the fill of black's swatches that I name it crack and shadow. This layer is sent to the back but in fornt of the layer of Iceberg(Dark Blue)
 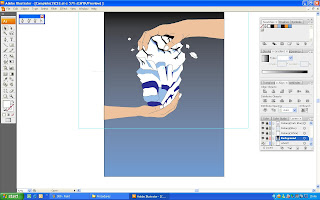 As all the illustartion are done, I move on to the background illustration. I create a new layer first with the name of background. After that I search through the swatch library and find one blue and black swatches to be use as the background colour and name both of it to background 1 and background 2. On the backgound's layer, I draw a rectangle around the whole A3 size of my illustration and select the gradient colour to fill in and also the stroke change to none. At the gradient's window, I drag the swatches of backgound1 and 2 to each arrow of the gradient. Then, I rotate the gradient at the gradient's window to 90 degree. I sent the background layer to the back but before the sketch's layer.
 I proceed to the statement procedures, I create a new layer with the name of wording. I start with the main statement of destruct. I select the Type tool and click onto the illustration and type the word of DESTRUCT and change the font size to 72. The fill colour is change to the orange colour of swatch that I selected and rename it to wording. I repeat the procedures for the wording of PROTECT too. I arrange both with the aid of selection tool to the location that I wanted. I also made another two small statement to give a small idea to my audience. The same procedure but font size set to 36 and fill to white swatch which I selected and name it wording(White). Since, there are two small statement, it will be one type "IS A MATTER OF CHOICE" and another "CHOOSE WISELY". So, both could be change to it location with selection tool to it rightful position in the poster.
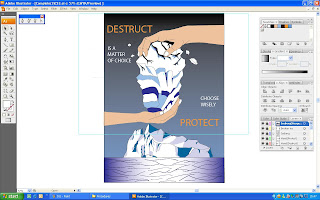 Following the next step will be creating a new layer with the name of Iceberg(Assgn 2) which I will import the whole Iceberg that I illustrate for the assignment 2 to this layer. I open the file of the assignment 2 and with select tool I drag the whole Iceberg and pull it into the assignment 3 and resize it with the help of free transform tool and locate it to the bottom of the poster.
 Lastly, with the previous same method I import the symbol from assignment 1 to the poster on the new layer that I rename it symbol. I resize it with the help of Free Transform tool and place it bottom right corner.

No comments:
Post a Comment